Getting Started with React
Snowpack is a great fit for React projects of any size. It’s easy to get started and can scale to projects containing thousands of components and pages without any impact on development speed. Unlike traditional React application tooling, Snowpack saves you from getting bogged down with complex bundler setups and configuration files.
In this guide, you’ll go from an empty directory to a fully configured Snowpack project with support for React and several other useful developer tools. In the process, you’ll learn:
- How to set up your Snowpack development environment
- Adding your first React component
- Working with CSS, images and other web assets
- Enabling Fast Refresh mode for React
- Connecting your favorite tools
Prerequisites: Snowpack is a command line tool installed from npm. This guide assumes a basic understanding of Node.js, npm, and how to run commands in the terminal. Knowledge of React is not required, Snowpack is a great way to learn React!
💡 Tip: if you want to jump to the end to see a full featured React setup, the Create Snowpack App React template comes with everything you’ll learn in this guide plus other useful tools.
Getting started
The easiest way to start a new Snowpack project is with Create Snowpack App, a tool to set up Snowpack in a new directory. @snowpack/project-template-minimal is a Create Snowpack App template for a simple, bare-bones Snowpack project setup that the rest of this guide builds on.
To get started, open your terminal and head to a directory where you want to put your new project. Now run the following command in your terminal to create a new directory called react-snowpack with the minimal template automatically installed.
npx create-snowpack-app react-snowpack --template @snowpack/app-template-minimal
You can now head to the new directory and start Snowpack with the following two commands:
cd react-snowpack
npm run start
You should see your new website up and running!
💡 Tip: the
README.mdin your new project contains useful information about what each file does.

Now that you have a basic project up and running, to install React, run the following command in your project directory:
npm install react react-dom --save
💡 Tip: add the
--use-yarnor--use-pnpmflag to use something other than npm
Create your first React component
React relies on a special templating language called JSX. If you’re familiar with React then you already know JSX: it’s React’s templating language that allows you to write something like <App /> or <Header></Header> directly in your JavaScript code.
Snowpack has built in support for JSX in files using the .jsx extension. That means that there’s no plugins or configuration needed to write your first React component. Rename index.js file to index.jsx so that Snowpack knows to handle JSX in the file:
mv index.js index.jsx
💡 Tip: you do not need to update your
index.htmlscript tag reference to point toindex.jsx. Browsers don’t speak JSX (or TypeScript, for that matter), so any compile-to-JS file formats compile to.jsin the final browser build. This is good to keep in mind when you’re referencing built files in HTML<script src="">and<link href="">elements.
You can now import React in index.jsx and add a simple test component just to make sure it’s working:
  /* Add JavaScript code here! */
- console.log('Hello World! You did it! Welcome to Snowpack :D');
+ import React from 'react';
+ import ReactDOM from 'react-dom';
+ ReactDOM.render(<div>"HELLO REACT"</div>, document.getElementById('root'));
Since the React code is rendering into an element with the ID root, you’ll need to add that to index.html:
  <body>
-   <h1>Welcome to Snowpack!</h1>
+   <div id="root"></div>
    <script type="module" src="/index.js"></script>
  </body>

You’ve just created your first React component in Snowpack!
Customize your project layout
Since you’ll be adding a bunch of new files, you probably don’t want them crowding up your top-level root directly. Snowpack is flexible enough to support whatever project layout that you prefer. In this guide, you’ll learn how to use a popular project pattern from the React community.
📁 src : your React components and their assets (CSS, images)
    ↳ index.jsx
📁 public : global assets like images, fonts, icons, and global CSS
    ↳ index.css
    ↳ index.html
Use your favorite visual editor to rearrange and rename, or run these commands in the terminal:
mkdir src
mkdir public
mv index.jsx src/index.jsx
mv index.html public/index.html
mv index.css public/index.css
This means if you are running Snowpack right now, the site is now broken as the files are all in different places. Lets add a “mount” configuration to update your site to your new project layout.
The mount configuration changes where Snowpack looks for and builds files. Every Snowpack project comes with a snowpack.config.mjs file for any configuration that you might need. Right now, you should see a configuration file with empty options. Add this to the empty mount object:
  export default {
    mount: {
-     /* ... */
+     // directory name: 'build directory'
+     public: '/',
+     src: '/dist',
    },
  };
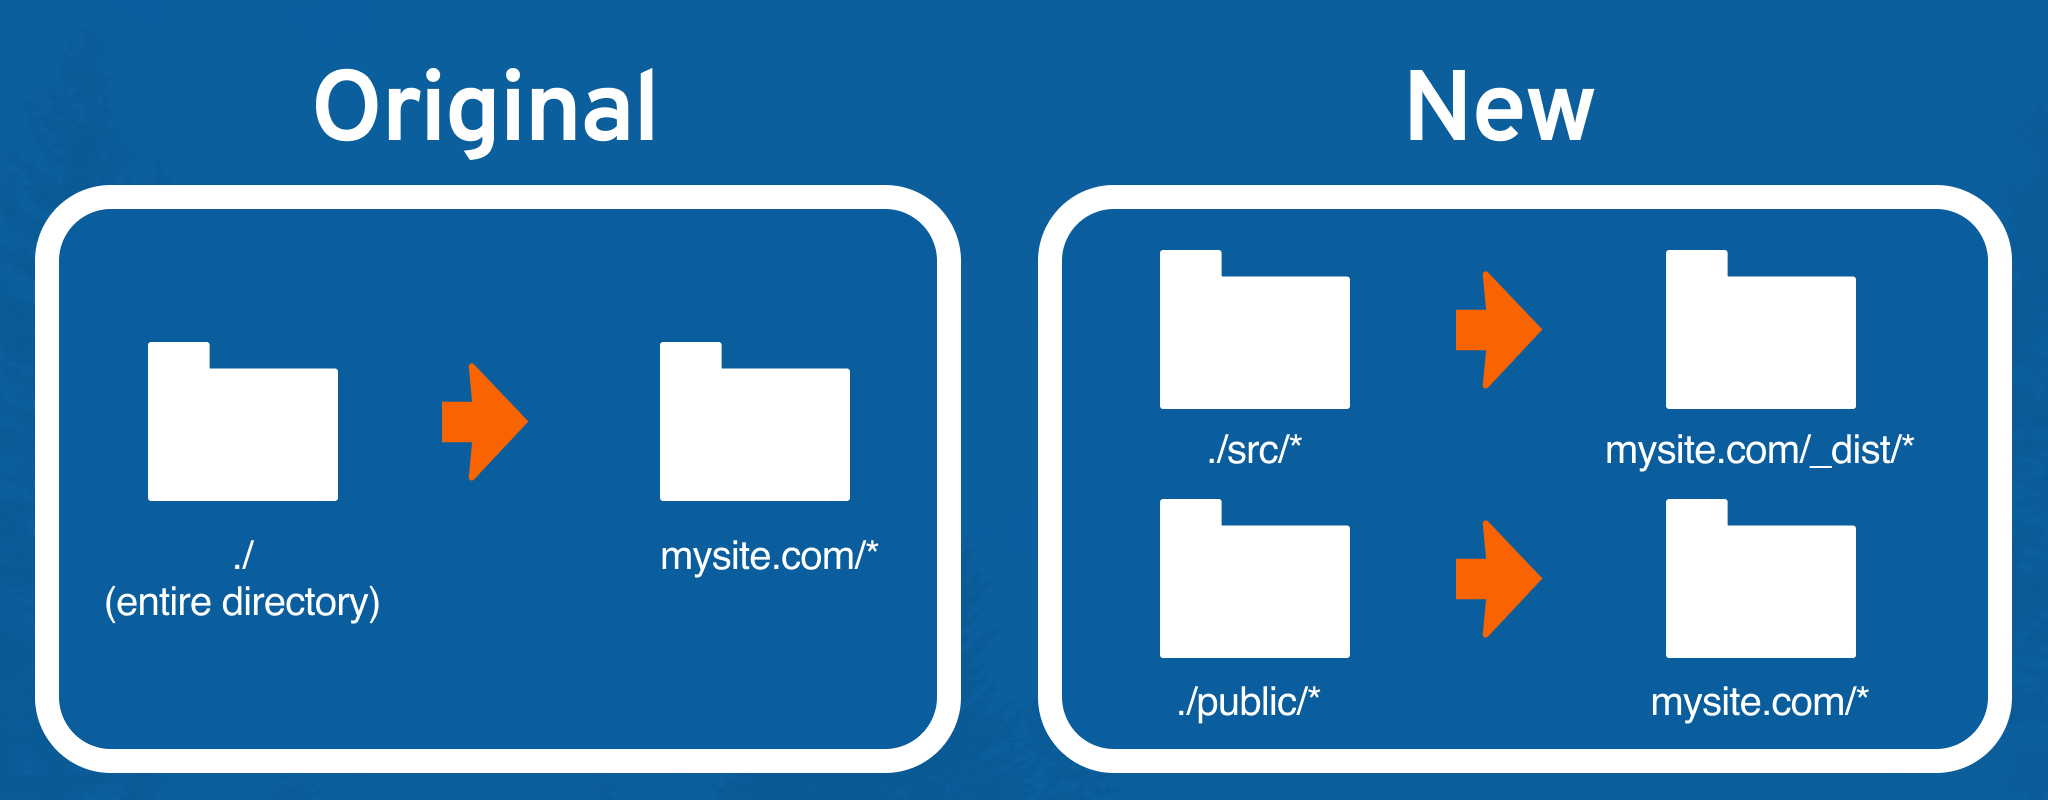
mount is part of the Snowpack Configuration API. It allows you to customize the file structure of your project. The key is the name of the directory and the value is where you’d like them in the final build. With this new configuration, Snowpack builds files in public like public/index.css directory into index.css. It builds files in src like src/index.js into /dist/index.js, so you’ll need to change that path in your index.html:
  <body>
    <h1>Welcome to Snowpack!</h1>
    <div id="root"></div>
-   <script type="module" src="/index.js"></script>
+   <script type="module" src="/dist/index.js"></script>
  </body>
You’ll need to restart Snowpack for configuration file changes. When you start up again, if it worked, it should look the same.
Create a new file at src/App.jsx and paste the following code into this new file to create an App component:
import React, {useState, useEffect} from 'react';

function App() {
  // Create the count state.
  const [count, setCount] = useState(0);
  // Update the count (+1 every second).
  useEffect(() => {
    const timer = setTimeout(() => setCount(count + 1), 1000);
    return () => clearTimeout(timer);
  }, [count, setCount]);
  // Return the App component.
  return (
    <div className="App">
      <header className="App-header">
        <p>
          Page has been open for <code>{count}</code> seconds.
        </p>
      </header>
    </div>
  );
}

export default App;
Now include it in index.jsx
  import React from 'react';
  import ReactDOM from 'react-dom';
- ReactDOM.render(<div>"HELLO WORLD"</div>, document.getElementById('root'));
+ import App from './App.jsx';
+ ReactDOM.render(
+   <React.StrictMode>
+     <App />
+   </React.StrictMode>,
+   document.getElementById('root'),
+ );
💡 Tip: Strict Mode is a tool for highlighting potential problems in React code.
You shouldn’t need to restart Snowpack to see this, it should look like this:

Styling your project
When you add assets like images or CSS, Snowpack includes them in your final build. If you already know React, this process should look pretty familiar.
💡 Tip: as you’re doing this, you should not need to reload the page or restart Snowpack. Snowpack automatically updates the project in the browser as you edit code.
Add this file logo.svg to your src directory. Now you can import it into your App.jsx and use it in an img tag to display it.
  import React, { useState, useEffect } from 'react';
+ import logo from './logo.svg';

  function App() {
    // Create the count state.
    const [count, setCount] = useState(0);
    // Create the counter (+1 every second).
    useEffect(() => {
      const timer = setTimeout(() => setCount(count + 1), 1000);
      return () => clearTimeout(timer);
    }, [count, setCount]);
    // Return the App component.
    return (
      <div className="App">
        <header className="App-header">
+       <img src={logo} className="App-logo" alt="logo" />
        <p>
The project already has index.css for global styles. For CSS that’s only for a specific component, a common design pattern is to add it in a CSS file with the same base name as the component. The style file for App.jsx would be App.css with this pattern.
💡 Tip: Snowpack has built-in support for CSS Modules and if you’d like to use Sass there is an official Sass Plugin.
Create src/App.css and add this CSS:
.App {
  text-align: center;
}

.App p {
  margin: 0.4rem;
}

.App-logo {
  height: 40vmin;
}

@media (prefers-reduced-motion: no-preference) {
  .App-logo {
    animation: App-logo-spin infinite 20s linear;
  }
}

.App-header {
  background-color: #282c34;
  min-height: 100vh;
  display: flex;
  flex-direction: column;
  align-items: center;
  justify-content: center;
  font-size: calc(10px + 2vmin);
  color: white;
}

@keyframes App-logo-spin {
  from {
    transform: rotate(0deg);
  }
  to {
    transform: rotate(360deg);
  }
}
To use this CSS, head to App.jsx and import it
  import logo from './logo.svg';
+ import './App.css';
Making Snowpack Even Faster with Fast Refresh
React Fast Refresh? What’s that? It’s a Snowpack enhancement that lets you push individual file changes to update the browser without refreshing the page or clearing component state.
React projects are often interactive and include state. For example, this project you’re building has a state that is the amount of time on the page. When developing with state it’s useful not to lose it while you edit code. React Fast Refresh shows you updates without refreshing the entire page. Showing you how to add this is also a good intro to Snowpack plugins. Snowpack starts with a minimal setup with the perspective that you can add what you need through the plugin system.
Start by enabling Hot Module Replacement in your project. HMR is the system that lets Snowpack push updates to the browser without a full page refresh, a requirement for Fast Refresh. You can enable HMR for React by adding a small snippet of code to your src/index.jsx file.
  ReactDOM.render(
    <React.StrictMode>
      <App />
    </React.StrictMode>,
    document.getElementById('root'),
  );
+ // Hot Module Replacement (HMR) - Remove this snippet to remove HMR.
+ // Learn more: https://www.snowpack.dev/concepts/hot-module-replacement
+ if (undefined /* [snowpack] import.meta.hot */ ) {
+   undefined /* [snowpack] import.meta.hot */ .accept();
+ }
Now when you change App.jsx the page updates to show your changes without a full refresh.
HMR can save you time on its own, but you may notice in the example above that the counter on the page still resets to 0. This can slow down your development, especially when you’re trying to debug a specific component state problem. Lets enable Fast Refresh to preserve component state across updates.
To enable Fast Refresh, you’ll need to install the @snowpack/plugin-react-refresh package. This package is a Snowpack plugin, which you can use to enhance or customize Snowpack with all sorts of new behaviors. To start, install the package in your project:
npm install @snowpack/plugin-react-refresh --save-dev
Once installed, you’ll need to add the plugin to your Snowpack configuration file so that Snowpack knows to use it:
  module.exports = {
    mount: {
      public: '/',
      src: '/dist',
    },
-   plugins: []
+   plugins: ['@snowpack/plugin-react-refresh'],
  };
Restart Snowpack to apply the new plugin, and then try changing the App.jsx component again. If Fast Refresh is working properly, the counter keeps its value across changes, without resetting to zero.
Going further
Great job! You’re now ready to build the React project of your dreams with Snowpack. Want to tweet your accomplishment to the world? Click the button below:
At this point you have the basics and have a great starter for any React project. But if you compare with the official Snowpack React template you’ll notice it has some other developer tools you might find useful:
- Prettier — a popular code formatter
- Tests — Snowpack supports any popular JavaScript testing framework
@snowpack/plugin-dotenv— Usedotenvin your Snowpack. This is useful for environment specific variables
If you’d like to use Typescript with Snowpack and React, check out the Snowpack React Typescript starter.
If you have any questions, comments, or corrections, we’d love to hear from you in the Snowpack discussion forum or our Snowpack Discord community.